|
When shipped from the factory, the AP-3 contains "boot loader" and "image" software. The boot loader initializes the AP-3 on power-up, and the executable image (AP Image) is the real-time AP-3 software.
Since each network configuration is different, your AP-3 must be initialized with the proper IP Address. After assigning an IP Address, use the HTTP Interface or the CLI to configure the AP-3. Refer to "Configuration" for more information.
You can assign the IP Address using one of the following options:
Assign IP Address using DHCP
When using DHCP, network administrators typically reserve an IP Address for each AP-3 based on its MAC Address. Each time a unit reboots, the DHCP Server assigns the same IP Address. This method helps track network devices and facilitates unit configuration. The AP-3 also accepts a dynamic IP Address from a DHCP Server Pool. If this is the case, you must identify the AP-3 IP Address before configuration. To identify the IP Address, view the client IP Pool Table in your DHCP Server, or use the Scan Tool utility to locate all AP-3 units, regardless of their state. You may then change certain network parameters.
Assign IP Address using the Scan Tool
Use Scan Tool to initialize units and download image files for any unit connected to the LAN subnet. You can set the IP Address, IP Address Type (Static or Dynamic), and other values. The Scan Tool.exe application is included on the installation CD-ROM.
 |
Scan Tool is very useful because units can be installed without prior
bench initialization. To track units, you must record the MAC
Address and physical location of each unit during installation. Since
Scan Tool identifies each unit by its MAC Address, you can install
multiple units simultaneously and initialize them from Scan Tool.
|
When sent from the factory, the AP-3 is set for DHCP operation. If using DHCP, the unit requests an IP Address from the DHCP server when rebooted or powered up. Since the IP Address could come from a large DHCP address pool, it may be difficult to identify the IP Address assigned to the unit. Use the following procedure to open Scan Tool and set AP-3 network parameters. You should have the AP-3 unit(s) and your computer connected to the same LAN subnet.
- Install the AP-3 hardware and connect the unit(s) to the LAN.
- Power up, reboot, or reset the AP-3. Result: If set for DHCP, the unit requests an IP Address from the network DHCP server.
- Open Scan Tool. Result: Scan Tool scans the subnet and locates all AP-3 units. The Scan Tool Main screen appears, similar to the example below, that shows a single unit in the factory default state
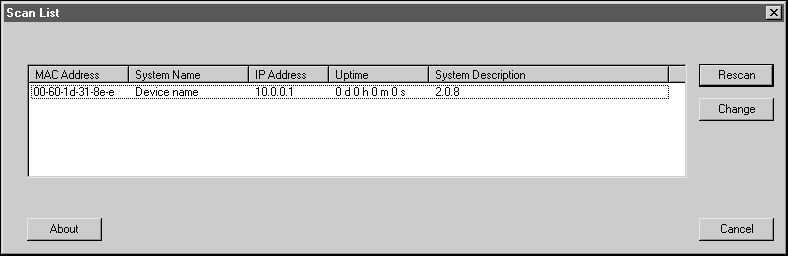
To re-scan the network and update the display after changing values, click the Rescan button. To change values or download an AP Image, select the desired unit, and then click the Change button. Result: the Scan Tool Change screen appears, similar to the following example. Our example shows a unit with factory default settings. 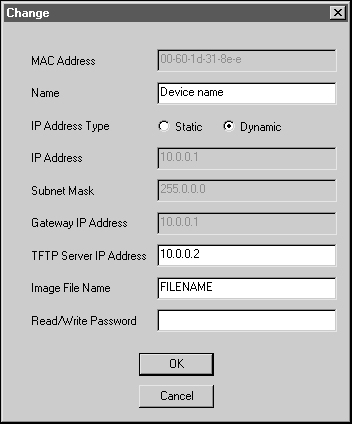
You may perform the following operations. Note that certain options are available only when selecting Static IP Address mode.
- MAC Address. This read-only field displays the MAC Address of the selected unit.
- Name. Enter the System Name of the unit. This is typically descriptive text, such as "Main Lobby".
- IP Address Type. Select Static if you wish to enter the IP values manually. Select DHCP to force the unit to request and IP Address from a DHCP server each time it is powered up or rebooted.
- IP Address. If you selected Static, then enter the IP Address.
- Subnet Mask. If you selected Static, then enter the Subnet Mask.
- Gateway IP Address. If you selected Static, then enter the IP Address of the Gateway.
- TFTP Server IP Address. If you wish to download a new AP Image file, then enter the IP Address of the TFTP server.
- Image File Name. If you wish to download a new AP Image file, then enter the full directory path and file name. If the file is located in the default TFTP directory, you need enter only the file name.
- Read/Write Password. Enter the read/write password. The default password is "public".
To reboot the unit to make the changes effective, verify the entered values and then click the OK button. Result: The unit will reboot and the new values will be in effect. To cancel the operation and return to the Scan Tool Main screen, click the Cancel button.
|

